Are you getting a moderate or worse, a strict NAT type in games on your Sony PlayStation 5 Console? Unfortunately, NAT is a necessary evil that often impedes online gaming performance. NAT is an acronym for network address translation.
NAT is a normal function used on home network routers. It is essential for connecting multiple devices to a single internet connection. When properly configured, NAT should not get in the way of multiplayer online gaming on PS5. Double NAT is an entirely different situation that you want to avoid at all costs. If you have double NAT issues, you must fix that first for port forwarding to work properly.
Port forwarding is a relatively straightforward process to enable your PS5 to navigate through NAT more easily. There are multiple steps that need to be followed in order to properly set up port forwarding.
Port Forwarding PS5

Step 1) Log in to your Router
The first step to setting up a static IP address is to locate the IP address of your router. On a PS5 console, this can be found by opening up your network settings. You will then look for the IP address listed under gateway. It will generally begin with either 192, 172, or 10 and will likely end in 1. When you find your gateway IP address, you will want to write it down or snap a picture of it for the next step.
You will need to complete these steps on your computer and not on the PS5 itself. You can use either a PC or Mac. It will work the same either way. If you do not have access to a computer, you could also use a tablet or smartphone. Using a computer is the best option, given the small text on your router configuration settings page.
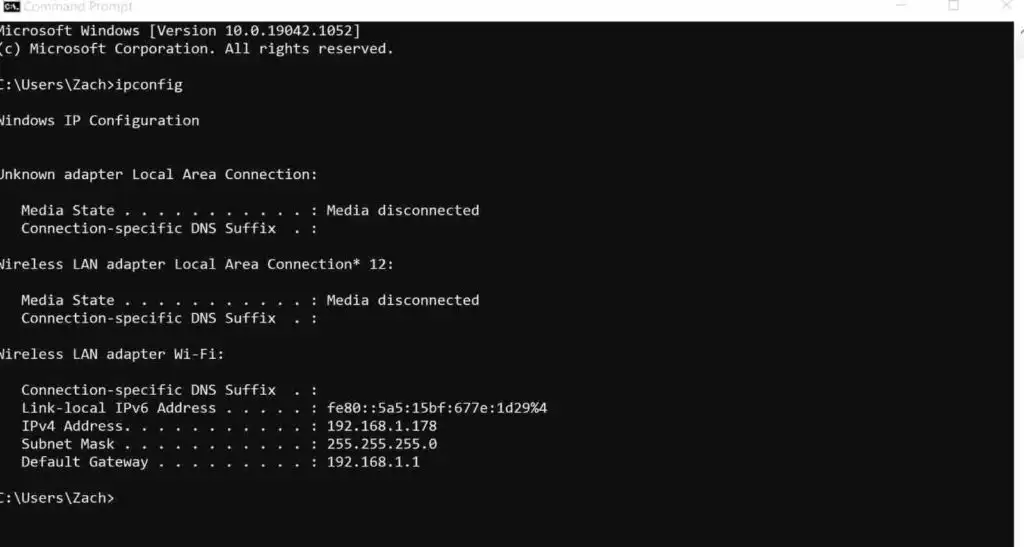
First, open the command prompt if you are on Windows or the terminal if you are on Mac or Linux. Type ipconfig into the command prompt or ifconfig into terminal, then press enter.
Look for the result that says default gateway. Write this down as we will use this in the next steps. Your default gateway is the IP address of your router.

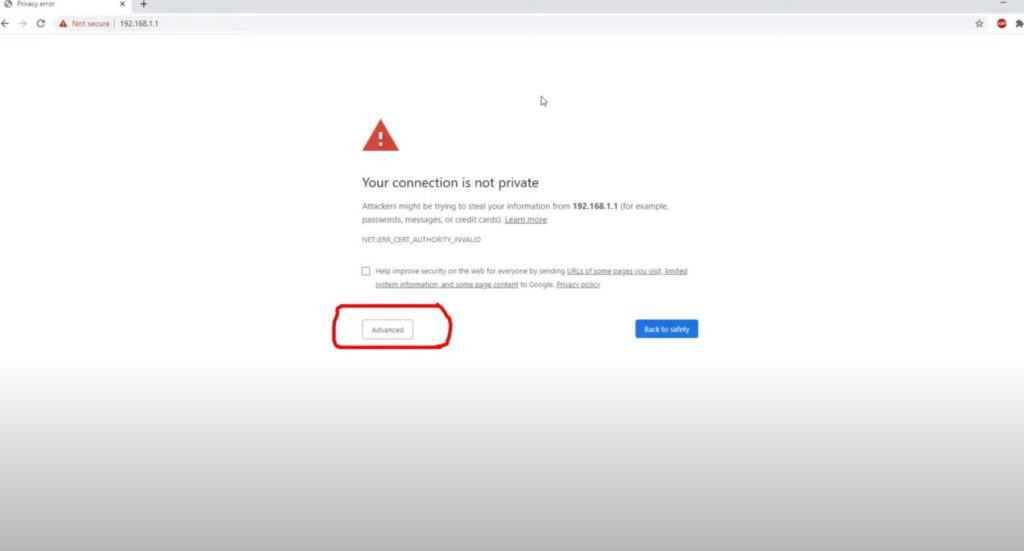
Open your favorite web browser. I am using Chrome, but this process will also work in any modern web browser, including Safari, Edge, Firefox, etc. In the address bar, enter the gateway IP address you wrote down from the previous step and press enter. Make sure you enter this into your address bar and not into a search toolbar.
This will open your router’s login page. You may get a security warning because many routers use a self-signed SSL certificate. This is completely normal and not a cause for concern. Simply choose to proceed anyways. You may need to click Advanced to expose this option if you are using Chrome.

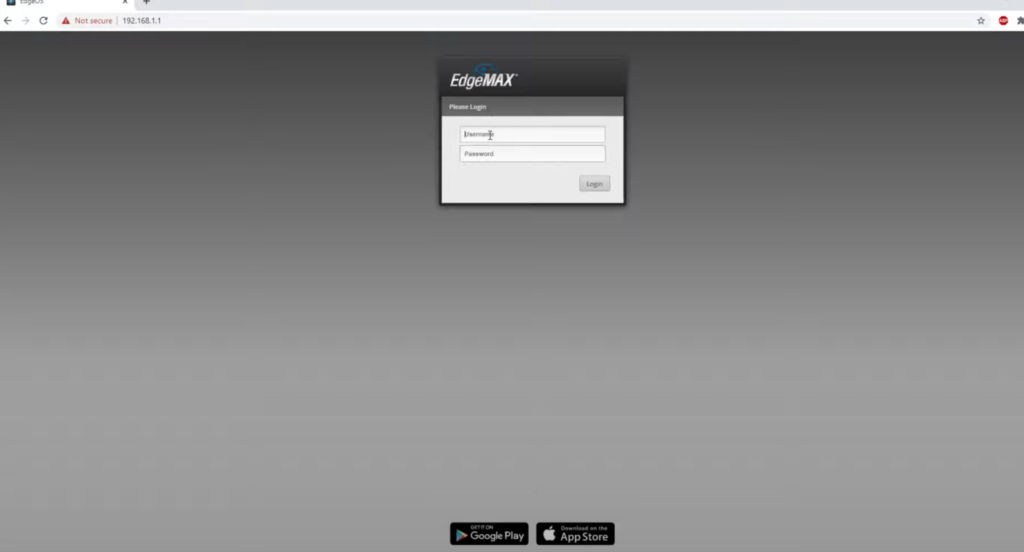
Now you should reach the login page of your router. If you changed your login credentials when you configured your router, you will use them here. If you did not change your login credentials, you will enter the default credentials for your router. In some cases, they are printed on a sticker attached to your router. If not, simply Google the brand and model of your router and look up the default login credentials. Once you enter your login credentials successfully, you should reach the admin dashboard of your router.
Step 2) Assign a Static IP Address to your PS5
If you have not already configured your PS5 to have a static IP address, please complete this first. You must have a static IP address assigned to your PS5 console for port forwarding to work properly. This can easily be done with most routers by setting up a DHCP reservation. This is generally the easiest method of setting up a static IP address on your PS5. It will also avoid IP conflicts that can occur when a static IP address is incorrectly set up.
From within your router’s dashboard will want to find your DHCP settings. On some routers, this will be listed under LAN settings, on others, it will be directly on the main dashboard. Your router will likely look a little different than mine, but most routers will have a DHCP settings page or menu. Once you find your DHCP settings page, you will want to open it up.
Now from within your DHCP settings, you will want to find your PS5 in the list of connected devices. Depending on how many devices are connected to your router, this list may be short or long. If you are unsure which device is your PS5 console, you can look for the IPv4 address or MAC address that matches your console. It is very important that we correctly identify the device during this step.
Once you locate your PS5 on the list, you will need to set the IP address as static. These will be called different things depending on the brand of your router. It is usually either set IP as static, reserve this IP address, create DHCP reservation, or something similar. Doing this will ensure that your PS5 is always assigned the same IP address. This is essential for port forwarding to work properly.
At this point, your PS5 has been set with a static IP address. There are no settings to change on the console when using this method, as the router handing the static IP automatically.
Step 3) Configure Port Forwarding
The PS5 uses the following ports.
- TCP 1935, 3478-3480
- UDP: 3074, 3478-3479
The process for setting up port forwarding will look a little different depending on the router you are using. In most routers, there will be a port forwarding section that you will use to do the configuration. On some routers, including most Netgear routers, the port forwarding section is listed under LAN settings.
Find the specific instructions for your router make and model.
Remember also to forward any ports required by the specific games you are playing. Some games use additional ports beyond the ports listed above.

Step 4) Restart your PS5 and Check the NAT Type
Open up your network settings on your console and check your NAT type. It should now show as open. If it does not show as open, you may need to restart your router and then check your NAT type again. Generally, a router restart is not required, but in some cases, it might be, especially on older routers. Once your NAT type is showing as open, you are finished. Enjoy your improved online multiplayer gaming experience.
Remember to check in your game and not using the PS5 network test utility. The PS5 will report a NAT type 2 even if port forwarding is set up properly. The only way to get a NAT type 1 is to connect your PS5 to the internet without using a router. NAT Type 1 means your PS5 has a public IP address. A NAT type 1 is a security risk and not necessary to get an open NAT type in games. A NAT type 2 with an open NAT in games is what you are looking for.
PS5 Port Forwarding NAT Type 1
Using port forwarding on your router will help you to change your NAT type to open within the games you play. However, port forwarding will not make your PS5 show a NAT type 1 on the PlayStation Network menu under any circumstances.
To get a NAT type 1 in the PlayStation settings menu requires that your PlayStation 5 have a public IP address rather than a private IP address. If you are behind a router, which you are if you need port forwarding, you will always see a NAT type 2 on the settings menu.
However, this doesn’t mean that you are going to have issues getting an open NAT type in the games that you play.

PS5 NAT Type 2 After Port Forwarding
If you are seeing a NAT Type 2 after port forwarding, this is completely normal. Port forwarding will not make your PS5 show a NAT type 1 in the PlayStation Network Settings Menu. You are still behind a router and using a private IP address and, therefore, will still show as NAT Type 2.
This is to be expected and is not an issue. Open up your favorite games and check your NAT type in the game itself. Here you should see that your NAT type is open. This is the result you are looking for. For most PS5 gamers, open NAT in games and NAT Type 2 in the settings menu is ideal.
Getting a NAT type 1 in the settings menu is pointless and requires connecting your PS5 directly to your modem without going through a router. This is not only a security risk, but it also means that you will not be able to connect any other devices except your PS5 unless you are paying extra to your ISP for multiple public IP addresses.
For the vast majority of gamers, open NAT in games, and NAT Type 2 in the settings menu is the goal. Port forwarding will allow you to reach this goal if done properly.
Conclusion: How to Port Forward PS5
Setting up port forwarding on your route is not difficult. It is also the best way to change your NAT type to open in games on PS5. Generally, the process takes less than 15 minutes and works without fail.
The most important thing to know with port forwarding is that it will not cause your PS5 to show NAT type 1 in the PSN settings menu. If you are frustrated and wondering why you are still seeing NAT type 2, now you know the reason.